How to Budget Your Money and Never Worry About an Overdraft Again (Free Tools)
The problem
I remember it like it was yesterday. I was on the highway about to take the exit to get to my street when I received a notification on my phone stating that I had once again overdrafted my bank account.
I used to handle my money with the mindset of — whatever I had in my account is the amount I was free to spend. This may be how you handle your money and as you’ve learned or will learn, it is not a smart way to play the money game.
The way I was managing my money was not working. As soon as I got home I fired up Google and began to search for resources that would teach me the ways of the wealthy.
The research
As I was researching, there was one name that kept popping up in the results. It was Dave Ramsey.
HOLD UP: This is not going to be a Dave Ramsey fanboy article. However, he does play an important part in my personal finance journey. Dave’s methods helped me tremendously when it came to managing my money in order to get out of debt. There is plenty of his finance advice that I don’t agree with beyond that.
The discovery and solution
With that said, what I did learn from Dave and what has come to be one of my most important personal finance practices is zero-based budgeting (ZBB).
Zero-based budgeting according to NerdWallet is described as: “a method that has you allocate all of your money to expenses, savings and debt payments. The goal is that your income minus your expenditures equals zero by the end of the month.”
In theory, you’re “spending” all of your money before actually spending it. You decide what that money will be spent on before you physically spend it.
Using ZBB I’ve created a method that works for me and it involves a spreadsheet and the EveryDollar app. Yes, this is Dave Ramsey’s app, but it’s honestly the best zero-based budgeting app I’ve used. And it’s free. Download it here.
Applying ZBB — Spreadsheet
Let’s work it out. For example, say I get $2,000 every two weeks from my paycheck. Before I ever spend a dime of that money, I’m going to open up my budget sheet (more on this below with a free template download) and allocate this money to categories in which I’m going to spend the money.
Download my budget sheet for free here*.
*NOTE: You cannot edit this file directly. Download it then open a new, private spreadsheet > File > Open > Upload.
When you enter your paycheck amount in the “Income” cell, the sheet will automatically “deduct” necessary living expenses such as rent, utilities, phone bill, subscriptions, student loans (luckily I’ve paid those off but I left that category in the template), etc.
These are the expenses that that rarely change or will never change.
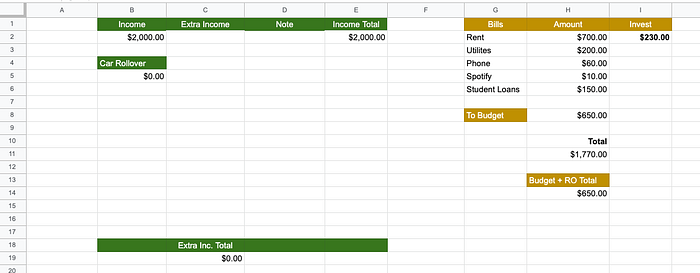
Then I decide on an amount that I would like to allocate to spend on leisure categories or categories that are not a necessity such as restaurants, entertainment, etc. I also keep groceries with these categories as a personal preference. This is shown in the “To Budget” cell ($650.00) in the screenshot above. This money is managed with the EveryDollar app. I’ll explain below how I use the app to manage this money.
Once the sheet adds up my bills and leisure categories, you can see that I’m left with $230.00. This is money that I will invest. In my case, when I had debt, I put this money towards paying that off.
Applying ZBB — EveryDollar
I mentioned above that I mainly track my “To Budget” money (that’s the $650.00 from the example), or the leisure categories using the EveryDollar app.
Similar to the spreadsheet I’ve created, the EveryDollar allows you to create categories in which you’ll spend your money. The first step is to add your income to the “Income” section found on the “Planned” tab.
Note: I’ve found that it’s easier to setup the budget using the desktop version of EveryDollar. I track my expenses using the app, however.
Next, you’ll find the categories in the sections below. There are some default subcategories, but you can edit, add, and delete these to your liking. To the right of the subcategory, you’ll see a dollar amount, likely $0.00. Tap on this and enter the amount that you want to plan to spend in that category.
Repeat these steps until the app tells you, you’ve reached an every dollar budget.
When you make a purchase, save your receipt or immediately enter the expense amount it into the app. After you record the purchase, you’ll see the dollar amount for the category decrease. That is the total you’ll have left to spend on that category.
I also record my spending in the spreadsheet just for peace of mind. It will automatically keep a running balance of the total “To Budget” money you have left to spend.
Money left over
I set up my EveryDollar budget and my spreadsheet budget every two weeks since that’s when I receive my paychecks. When I get a new paycheck and it’s time to set up a new spreadsheet, I just right click name of the tab (bottom of the window) and duplicate the sheet. Then I’ll make whatever adjustments I need for the bills associated with that part of the month.
In the new spreadsheet, I’ll record all the money I have left over from the previous two weeks in the section starting at A:22. This will separate the money into two categories, one is “To Spend” — money I didn’t spend but will add to the next budget to spend. For me personally, this is usually just money that I didn’t use on my vehicle category (I keep this available to spend and also add $30 to it every two weeks). The other category is “To Debt/Savings”. This is money that I would throw at my debt or in my case now, money I will invest.

That’s it! You now know without a doubt how much money you can spend on certain items/categories and you’ll never have to fear accidentally overdrafting your account again. You know exactly where you money is going and what items you’re spending it on.
If you have any questions about these tools and how I implement them or how they work together, just let me know. I’m happy to help get you up and running.
Happy budgeting!